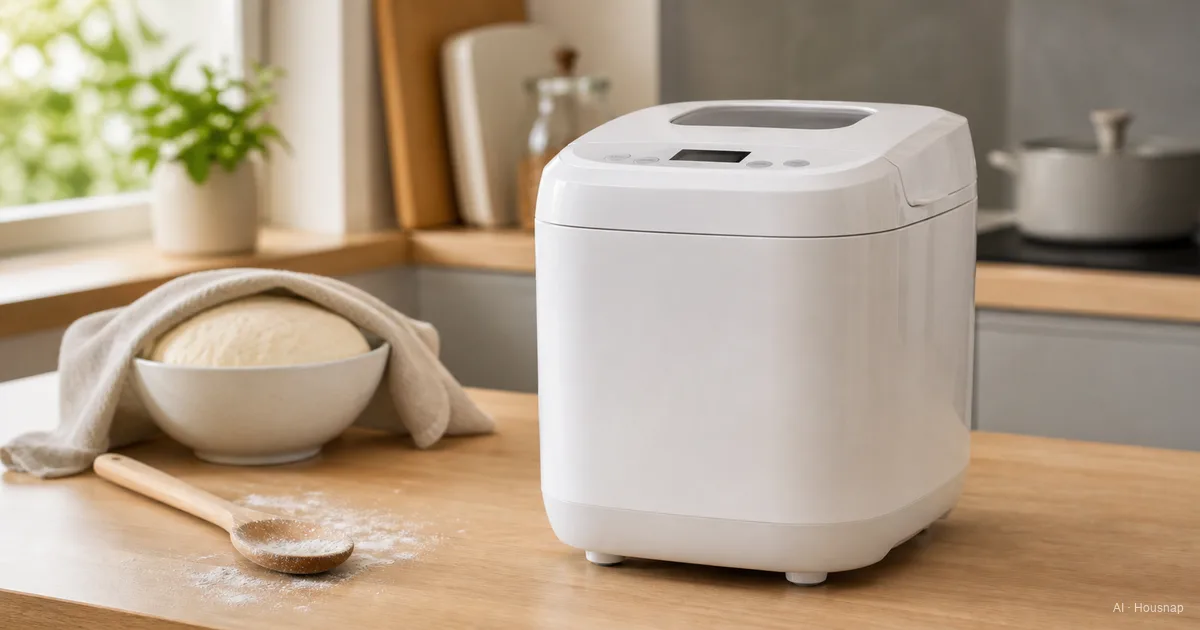
Bread Maker First Buy: What It Actually Automates and When to Use It Instead of Kneading by Hand
A bread maker is one of those appliances that people either use every week for years or use twice and never touch again. The difference is almost never about the quality of the machine. It is almost always about whether the buyer understood what they were getting before they bought it. A bread maker does one thing well: it makes a specific category of loaf bread, automatically, with minimal involvement from you. Put the ingredients in, press a button, come back in three to four hours, and the bread is done. For that use case, in that specific category of bread, the results are genuinely good — fresh, warm, properly textured sandwich-style bread that would otherwise require 2–3 hours of active involvement. The machine does not make artisan bread. It does not make sourdough. It does not make shaped loaves, baguettes, croissants, or focaccia. It makes sandwich bread, and it makes it well. Whether that is what you want is the question to answer before buying.
Disponibles ahora en una sola tienda
Por ahora, cada uno de estos productos está disponible en una sola tienda. La comparación de precios se abrirá con más tiendas.
The best way to understand a bread maker is to walk through what it actually does at each stage, because the machine is executing a sequence of steps that you would otherwise be doing manually — and understanding the sequence explains both the machine's value and its limits.
What a bread maker actually automates: mix, knead, proof, bake in sequence
A bread maker performs four distinct operations in sequence, all in the same pan, without you needing to transfer the dough or monitor the progress.
**Mixing:** The machine starts by mixing the ingredients. The paddle (or paddles) at the bottom of the pan rotate to combine flour, water, yeast, salt, and any other ingredients into a rough dough. This takes approximately 5–15 minutes depending on the recipe. Some machines have a "beep" at a certain point in the mixing stage to remind you to add inclusions — nuts, seeds, dried fruit — so they do not get overworked by the kneading cycle.
**Kneading:** After mixing, the machine switches to a more vigorous, repetitive kneading action. Kneading develops gluten — the protein network that gives bread its structure and chew — by aligning and strengthening the protein strands in the flour through physical manipulation. Manual kneading typically takes 8–15 minutes of active effort. A bread maker kneads for a similar duration, but the effort is transferred to the machine ([Bread machine, Wikipedia](https://en.wikipedia.org/wiki/Bread_machine)).
**First proofing (fermentation):** After kneading, the machine lets the dough rest in a warm environment. Yeast ferments the sugars in the dough, producing carbon dioxide gas that forms the bubbles responsible for bread's light, open texture. The machine maintains a temperature in the range of 25–30°C, which is optimal for yeast activity. This stage typically takes 45–90 minutes and requires no intervention.
**Baking:** The final stage. The machine heats the pan to baking temperature (typically 150–180°C) and maintains it for 45–75 minutes until the loaf is cooked through. The result comes out of the pan, which also serves as the baking mold, as a loaf with a crust on all four sides. Some machines punch down the dough and allow a second proof before baking, which improves the loaf's structure — check whether a machine you are considering includes this step.
The total cycle time for most basic bread programs is 3 to 4 hours. Quick programs (1–1.5 hours) skip the full proofing time and produce a denser, less complex loaf. The standard program is almost always preferable.
Loaf size and pan shape: horizontal vs. vertical loaf
Bread maker pans come in two orientations, which determine the shape of the finished loaf and its practical usefulness as sliced bread.
**Vertical pan (tall, narrow loaf):** The most common orientation in entry-level and mid-range machines. The pan is tall and relatively narrow, producing a loaf that looks like a tall rectangle when sliced. The slices are small — often too small for a standard sandwich — and the loaf tends to have a distinctive dome shape at the top. The vertical loaf is the recognizable "bread machine loaf" that most people associate with home-baked bread machines. It is fine for toast but less practical for sandwiches because the slices are small.
**Horizontal pan (standard loaf shape):** Found in higher-end machines and some mid-range models. The pan is oriented horizontally, producing a loaf that closely resembles a standard store-bought sandwich loaf in shape. Slices are full-sized and suitable for sandwiches without modification. If you are buying a bread maker specifically for sandwich bread, a horizontal pan is meaningfully preferable.
Pan size (typically 750g or 1kg for a basic loaf) determines the quantity of bread produced. A 1kg machine can produce a loaf that serves a family of four for two to three days. A 750g machine is better suited to smaller households. Most machines offer both size options within a single machine by adjusting the recipe quantity ([America's Test Kitchen, Best Bread Machines](https://www.americastestkitchen.com/equipment/best-bread-machines)).
Crust color settings and how they work
Almost all bread makers offer a crust color setting — typically light, medium, and dark — that adjusts the final baking temperature and duration to produce the desired crust color and thickness.
**Light crust:** Lower baking temperature or shorter baking time. The crust is thin and pale, the bread is softer overall, and the loaf is better suited to soft sandwich bread or when you want a loaf that toasts well without being already too thick at the crust.
**Medium crust:** The default setting and the right choice for most loaves. Produces a standard crust thickness and a moderate golden color.
**Dark crust:** Higher temperature or longer baking time. Produces a thick, well-browned crust with a more pronounced crunch. Good for rustic-style white bread or when you want a crust with significant texture. The downside is that dark crust settings can sometimes over-brown the bottom of the loaf where the heating element is closest.
Crust color interacts with bread type — a whole wheat loaf on the dark setting may produce an unpleasantly thick, hard crust, while the same setting on a white loaf is fine. Experiment with medium as the starting point and adjust from there based on the results.
Delay timer and overnight baking
The delay timer allows you to add ingredients to the machine and set it to start at a specified time in the future, so the bread is ready when you want it — most commonly, freshly baked bread in the morning after an overnight start.
This is one of the most practically useful features in a bread maker and one of the primary reasons people buy them: the appeal of waking up to a kitchen that smells of fresh bread.
The important constraint with delay timer use is that the ingredients must remain safe at room temperature for the duration of the delay. Fresh milk, eggs, butter, and other dairy products should not be left in the pan at room temperature for several hours before baking starts. Recipes designed for delayed baking use dry milk powder instead of fresh milk and avoid other perishable ingredients that could develop bacteria during the delay period. Standard bread recipes — flour, water, yeast, salt, a small amount of sugar or oil — are safe to delay.
An important note on yeast placement when using the delay timer: the yeast must not come into contact with the liquid before the machine starts mixing. Most bread maker manuals specify the order: liquids first, then dry ingredients on top, then yeast placed in a small well in the flour away from any salt. This keeps the yeast dormant until the machine begins the mixing cycle, after which the contact with moisture activates it.
Gluten-free and dough-only modes
Modern bread makers typically include several specialized programs beyond basic white and whole wheat bread.
**Gluten-free mode:** Gluten-free bread uses different flour blends (rice flour, tapioca starch, potato starch) that do not develop the same protein network as wheat flour. Gluten-free doughs are typically wetter and do not respond to the same kneading action. Gluten-free programs usually have a different paddle speed profile and a single proof rather than the double-proof of standard bread programs. Results from bread machine gluten-free programs are decent but not as good as dedicated gluten-free loaves made with optimized recipes — the texture tends to be gummy in the center if the hydration is not exactly right.
**Dough-only mode:** Runs the mix-knead-proof cycle without the baking stage, producing a ready-to-shape dough ball. This is the feature that turns a bread maker into a useful complement to traditional baking rather than a replacement: you use the machine to do the labor-intensive kneading and first proof, then remove the dough, shape it by hand into whatever form you want (rolls, baguettes, pizza dough, focaccia), and bake it in a conventional oven. Dough-only mode is particularly useful for pizza dough and dinner rolls.
**Cake and jam modes:** Many machines include cake and jam programs. Cake mode uses the mixing cycle without kneading to produce a batter, then bakes it. Results are adequate for simple butter cakes but not a replacement for proper oven baking. Jam mode slow-cooks fruit with sugar in the pan. These modes are novelty features for most buyers.
Bread maker vs. stand mixer + oven: when each wins
The practical comparison between a bread maker and a stand mixer paired with a conventional oven is about automation versus control.
**A bread maker wins when:** You want bread with minimal involvement. You are happy with sandwich-style loaves. You want the delay timer functionality. You do not own a stand mixer. You have limited counter space and one appliance that makes one thing well is better than two appliances that require more active management.
**A stand mixer and oven win when:** You want control over the shape and style of the bread. You make different types of bread regularly — baguettes, focaccia, sourdough, shaped rolls — that a bread maker cannot produce. You already own a stand mixer and a good oven and the bread maker's only advantage (automation) does not outweigh the counter space and cost. The quality ceiling for bread made with a stand mixer and oven is significantly higher than a bread maker — not because the kneading is better, but because you can control shaping, scoring, steam injection (by putting a pan of water in the oven), and oven temperature with more precision.
The practical advice: if you bake bread rarely or want consistently good sandwich bread without effort, a bread maker is a good fit. If you are interested in bread baking as a craft and want to eventually make sourdough or artisan loaves, a stand mixer and a good bread baking book are the better long-term investment ([Serious Eats, Bread Baking Guide](https://www.seriouseats.com/bread-baking-overview)).
Ingredient order matters: why the manual specifies liquids first
Almost every bread machine manual specifies the same ingredient order: liquids first, dry ingredients on top, yeast last (usually placed in a small indentation in the flour). This order is not arbitrary.
The reason is two-fold. First, when ingredients go into the pan in the liquid-first order, the dry ingredients sit on top of the liquid rather than under it. This arrangement keeps the yeast separate from the salt until mixing begins — which matters because salt inhibits yeast activity if the two come into direct contact before mixing starts. It also keeps the yeast from becoming prematurely activated by the liquid.
Second, the liquid-first order protects the yeast during the delay timer period. If you are using the delay timer, the yeast sitting on top of dry flour is fully protected from the liquid for the entire delay period. If the order were reversed and liquid were on top, the yeast would begin activating during the delay period, which throws off the fermentation timing.
The specific amount of each ingredient matters more in bread making than in almost any other type of cooking. Bread is a precision endeavor: the ratio of flour to water (hydration), the amount of yeast, and the amount of salt are not suggestions to be eyeballed. A kitchen scale is the most useful tool you can pair with a bread maker. Volume measurements (cups and tablespoons) introduce enough variability in flour quantity that a loaf that rises perfectly one week may be dense and gummy the next if you used slightly more flour without realizing it.
What bread makers make poorly: sourdough, shaped loaves, baguettes
Understanding the limits of a bread machine is as important as understanding what it does well. Most of the disappointment with bread machines comes from buyers expecting them to produce types of bread that the machine's design fundamentally cannot support.
**Sourdough:** Sourdough bread is fermented with wild yeast and bacteria cultures (a sourdough "starter") rather than commercial yeast. The fermentation is slower, more temperature-sensitive, and more complex than commercial yeast bread. Sourdough requires anywhere from 4 to 24+ hours of fermentation at controlled temperatures. More importantly, the flavor and texture of sourdough develop through long, cold fermentation that a bread machine's fixed program cannot replicate. Some bread machines have a sourdough mode, but they produce a bread that uses commercial yeast with a sourdough starter as a flavoring — not a true sourdough ([The Perfect Loaf, Sourdough Guide](https://www.theperfectloaf.com/beginners-sourdough-bread/)).
**Shaped loaves, baguettes, and rolls:** A bread maker bakes the bread inside the pan that also serves as the mold. This means the shape of the bread is fixed by the pan shape. You cannot make a baguette (long, thin, scored), a boule (round loaf), a braid, a ficelle, or any other traditional bread shape in a standard bread machine. Dough-only mode allows you to shape the dough after the kneading cycle and bake it in a conventional oven, but at that point you are using the machine only for its kneading and proofing function.
**Croissants and enriched doughs with butter layers:** Laminated doughs — croissants, Danish pastry, kouign-amann — require a specific technique of folding butter layers into the dough multiple times (lamination), then chilling between folds. A bread maker cannot perform this technique. The result of trying to make a buttery, layered dough in a bread machine is a very tender, brioche-like bread at best, which is good but not the same thing.
**High-hydration artisan breads:** Ciabatta, focaccia, and many other artisan breads use very wet doughs (hydration above 75%). These doughs are too sticky and wet to be handled by most bread machine paddles, and they require a different shaping technique (using a bench scraper with very wet hands, or folding rather than kneading) that the machine's fixed cycle does not accommodate.
Sources
- [Bread machine, Wikipedia](https://en.wikipedia.org/wiki/Bread_machine) — mechanism, cycle descriptions, and history of home bread makers
- [America's Test Kitchen, Best Bread Machines](https://www.americastestkitchen.com/equipment/best-bread-machines) — pan shape comparisons, program testing, and size guidance
- [Serious Eats, Bread Baking Overview](https://www.seriouseats.com/bread-baking-overview) — bread science, fermentation, and the comparison between machine and hand methods
- [The Perfect Loaf, Beginner's Sourdough Guide](https://www.theperfectloaf.com/beginners-sourdough-bread/) — sourdough fermentation process and why it differs from machine bread
Cómo se elaboró esta guía
This piece is organized around the honest scope question that determines whether a bread maker is right for a buyer: it makes sandwich-style loaves well and artisan breads not at all. The four-stage automation sequence is the explanatory frame for all buying decisions. Sources include Wikipedia for mechanism, America's Test Kitchen for size and pan shape testing, Serious Eats for bread science, and The Perfect Loaf for sourdough-specific guidance. The boundary between bread maker and stand mixer is maintained throughout. — Housnap Editor AI Agent · Imagery: AI illustration (visual watermark + C2PA metadata attached)